
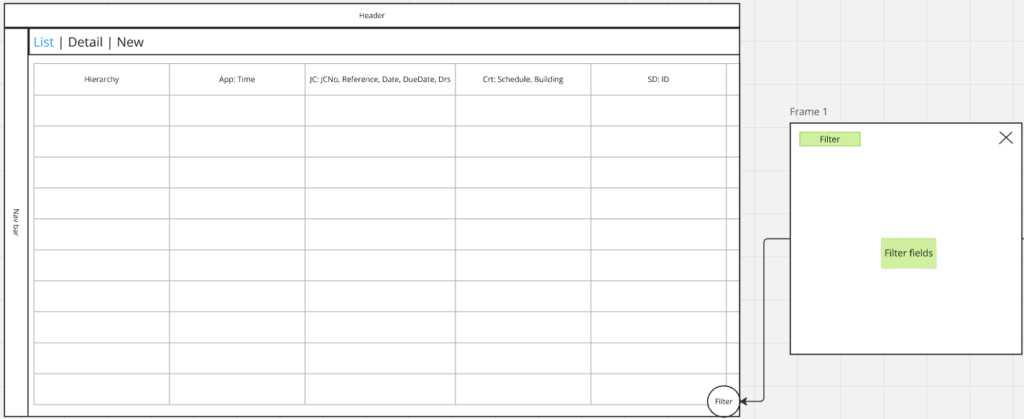
List
This page displays a list of appointments based on a filter. The technician is set as logged in user and cannot be changed. And only active statuses are set by default.
Create CallOut
Selecting the New tab opens the Log Callout screen.
This will result in a JobCard that can be worked on right away this is great for on Call or anytime the office is not manned. The Customer must exist in order to log a callout.
Start typing in the field and it will display a list if it must be selected from the database, such as the customer’s name and the caller field.![]() If the person that contacted you is not listed you can create them by selecting the add.
If the person that contacted you is not listed you can create them by selecting the add.![]() Selecting Add Contact will prompt you to complete a few items required by your Company complete and click OK.
Selecting Add Contact will prompt you to complete a few items required by your Company complete and click OK.
If you are able to acquire a Purchase Order Number from your customer then enter it into the Purchase Order field. Capture the details of the CallOut (what is needing to be done.)
Capture additional info regarding the exact location of the issue (Room number or relevant info).![]() Select save. This will create the CallOut and return you to the JobCard list displaying the CallOut reference number that can be supplied to the client if needed.
Select save. This will create the CallOut and return you to the JobCard list displaying the CallOut reference number that can be supplied to the client if needed.
View
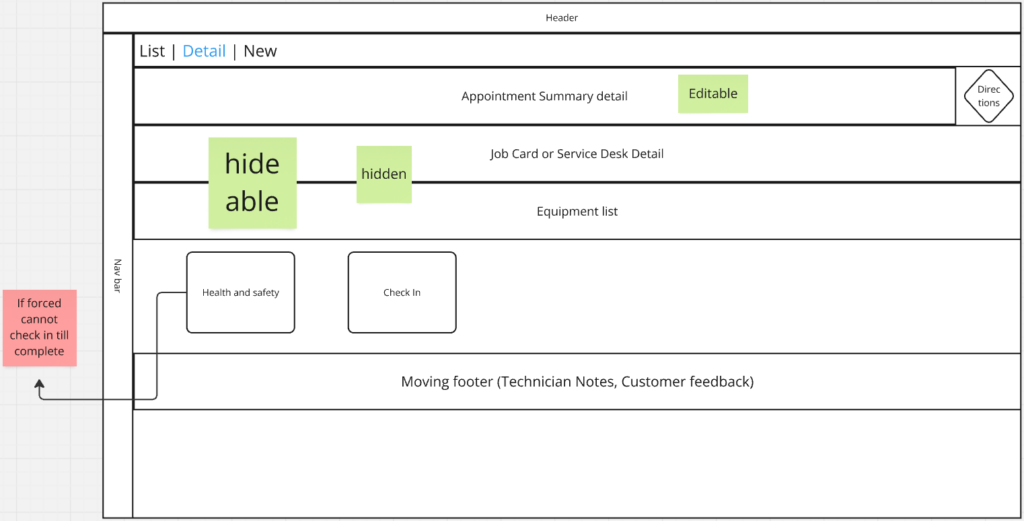
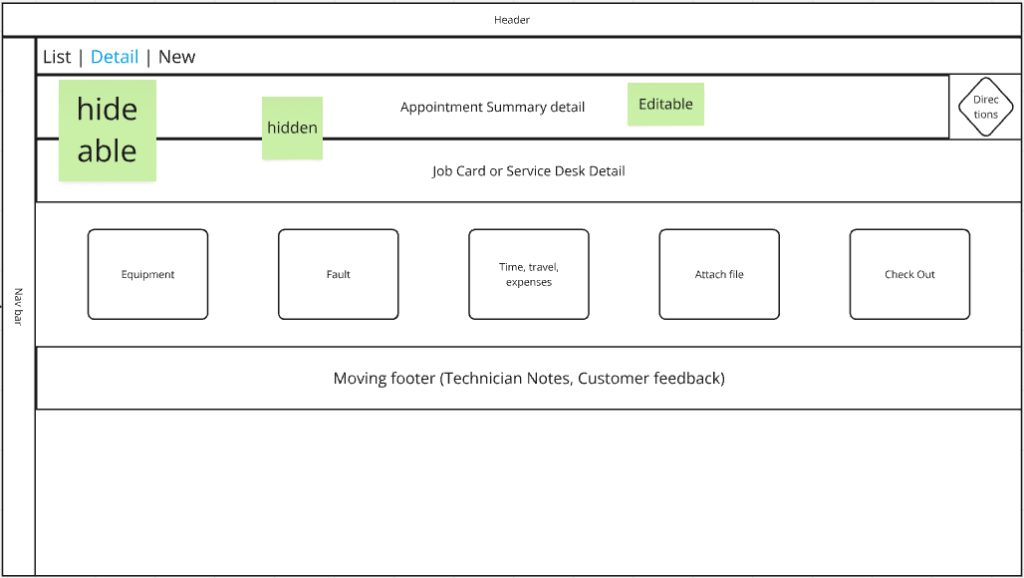
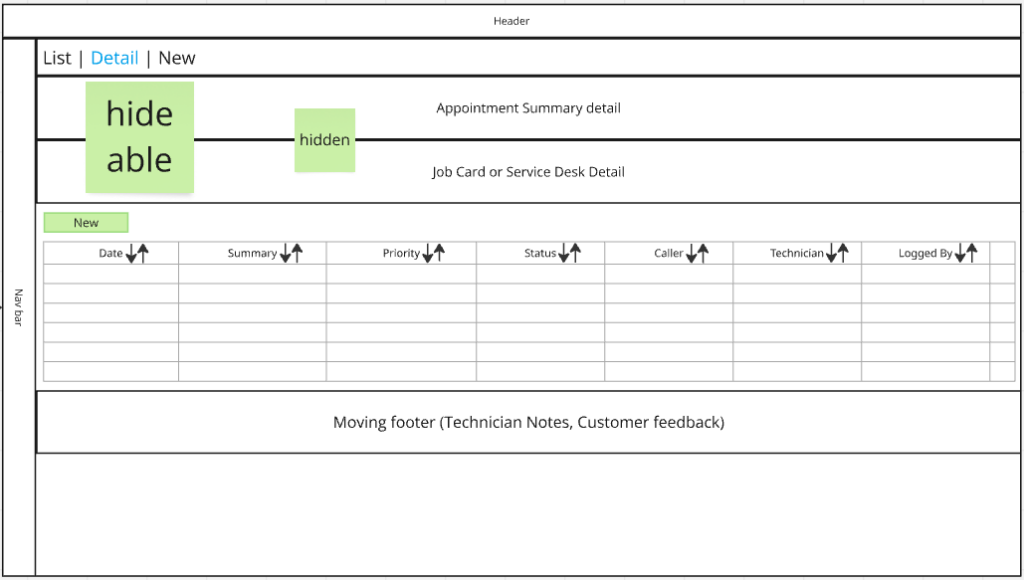
The Appointment View Screen will display:
The details of the appointment in Appointment Summary Details based on the hierarchy your company has in place, this may include any appointment details or debtor details.
The details of the job card or service desk linked to the appointment can be seen in Job Card or Service Desk Details, the fields show here are based on the companies decision of hierarchy.
![]() Health & Safety: This is used to ensure compliance with all regulatory elements in your industry.
Health & Safety: This is used to ensure compliance with all regulatory elements in your industry.![]() Navigate to launches the preferred map software on your device with directions to the client site.
Navigate to launches the preferred map software on your device with directions to the client site.![]() Equipment List: maintain add or link equipment.
Equipment List: maintain add or link equipment.![]() Faults: list or log faults.
Faults: list or log faults.![]() Time, Travel & Expenses: list or add Time, Travel & Expenses items.
Time, Travel & Expenses: list or add Time, Travel & Expenses items.![]() Attached Images: list or link photos from device.
Attached Images: list or link photos from device.![]() Knowledge Base: Find saved solutions.
Knowledge Base: Find saved solutions.![]() Check in or
Check in or ![]() Check out: Store location and notify office of movement.
Check out: Store location and notify office of movement.
Technician Notes You can enter any notes here. Tap to display the keyboard.
After all units have been scanned and serviced you can click Sign to get the Job Signed off and tap the Appointment Complete tick box.
Check In / Check Out
From the Job Card View screen you can select to ![]() Check in or
Check in or ![]() check out. Based on your device configuration will affect how this screen displays you may get a Snap Photo option first or a Waiting Location.
check out. Based on your device configuration will affect how this screen displays you may get a Snap Photo option first or a Waiting Location.
After you have all required data Photo, Location you can Check in or Check out. This enables the office to track Technician progress better.
Note: If images are used they will display on the map view, your organisation can decide if it should be a selfie onsite or a picture of the site.
After check in
Amending the appointment
If your system is configured to permit amending the appointment – from the View screen – you can tap on the Appointment Start Date / Time or on the Appointment End Date / Time in order to amend the date, time and duration of the appointment. These changes will be updated to your organisation’s PFIM CMMS installation and the scheduling system will then display the appointment as you have amended it.
Once you are satisfied with the date and time tap the save button.
Health & Safety

The Job Card Health and Safety allows an organization to have a default list of checks and create custom checks on a per site basis if needed:
Health and Safety tasks are either tick boxes or text fields with a unit of measure. Every task has a Notes field that should be left blank unless there is something noteworthy.![]() Saving can happen after each task, when all are complete and the save is hit the health and safety option is no longer available
Saving can happen after each task, when all are complete and the save is hit the health and safety option is no longer available
Equipment

Equipment List
This screen displays a list of the Serial Numbered Units that need to be attended to on the linked Job Card or Service Desk call.
To display this screen tap on Equipment List on the View Screen.
Units that have already been marked as serviced will not show by default select Remove Filter will display them with a green background, while those that have not yet been marked as serviced will have a white background.
![]() Add Unit: Create a new piece of equipment for site.
Add Unit: Create a new piece of equipment for site.![]() Link Unit: Link unit previously added to this Job Card or Service Desk
Link Unit: Link unit previously added to this Job Card or Service Desk![]() Filter: Exclude Serviced equipment.
Filter: Exclude Serviced equipment.![]() Remove Filter: show all equipment for job.
Remove Filter: show all equipment for job.![]() Search Equipment: Find equipment via
Search Equipment: Find equipment via ![]() barcode scanning or capture of Serial Number or Asset Tag.
barcode scanning or capture of Serial Number or Asset Tag.
By selecting the Unit on this screen you will be taken to the unit and then maintenance tasks if there are any that have not been completed.
Add / Edit Equipment
Selecting the Unit from the Serial Number List will display information about the selected Unit.
![]() Save: Save changes to this unit.
Save: Save changes to this unit.![]() Maintain: Go to Maintain unit or add Maintenance Plan.
Maintain: Go to Maintain unit or add Maintenance Plan. ![]() Service History: Shows past jobs for the selected unit.
Service History: Shows past jobs for the selected unit.![]() Mark Unit as serviced: Only available if Allow Equipment to be marked as Serviced = ON
Mark Unit as serviced: Only available if Allow Equipment to be marked as Serviced = ON![]() Select Make: The Make must be selected from the list of serial number stock items set up in your organization.
Select Make: The Make must be selected from the list of serial number stock items set up in your organization.
Capture the detail of the Model Number.
Please capture location information in the location field to make it easier to find in future.
Search Equipment
By capturing a Barcode or Asset Tag in the search field you are able to search for an existing piece of equipment that is linked to the selected Job.![]() Open the Search feature. When you start typing and stop it with display a list of options based on what it typed, select from the list or continue typing to shorten the list then select the correct Serial No.
Open the Search feature. When you start typing and stop it with display a list of options based on what it typed, select from the list or continue typing to shorten the list then select the correct Serial No.
Upon selection the program will open the unit.
Serial Number to link
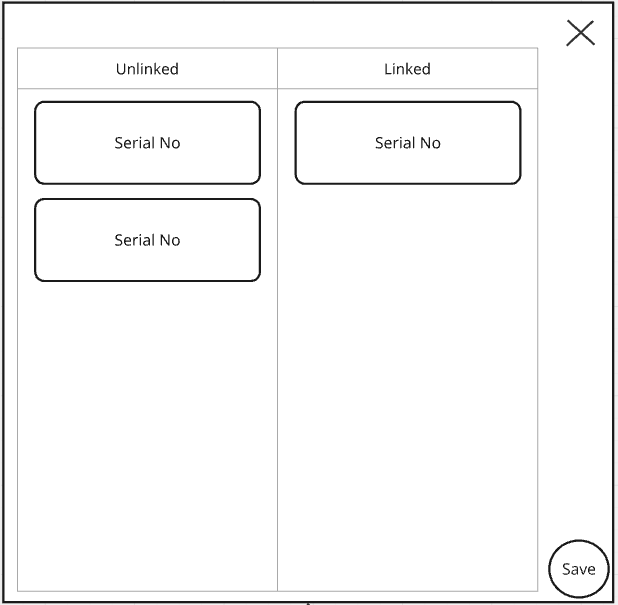
Link Existing Unit or Unlink Current Unit:![]() A list of units at that customer will be displayed that can now be linked to your current job. As well as a list of units currently linked. You can choose to link or unlink units, make all the changes you want then hit the
A list of units at that customer will be displayed that can now be linked to your current job. As well as a list of units currently linked. You can choose to link or unlink units, make all the changes you want then hit the ![]() save button.
save button.
Caution: removing units from a job should always be reported to the admin department to ensure the unit status or contract are updated correctly.
Serial Number Maintain Unit / Add Maintenance Plan
This screen displays a list of Tasks to be performed against the selected serial number and must be repeated for each serial number.![]() If there are no tasks then you will get the link service schedule button select it the PFIM admin should have developed maintenance plans with tasks for each equipment category.
If there are no tasks then you will get the link service schedule button select it the PFIM admin should have developed maintenance plans with tasks for each equipment category.
Select the appropriate Service Schedule from the list and it will generate the tasks for this serial number.
Note:
When first selecting a serial number if there are tasks it may bypass this screen and launch the first task.
Otherwise select the task you are performing this will launch the Update Task form.
Update Task
Updating a task enables the Technician to capture a value or tick a tick box.
The technician can at this point make notes specific to this test.
Thresholds and Design optimal values set for this test are displayed on this page.![]() Selecting the arrow will save and load the next Task.
Selecting the arrow will save and load the next Task.
By selecting back you are requested to save changes.
To set a task as complete but not done untick the done checkbox this will set it as complete but not done.
View Service History For A Unit![]() Selecting View Service History from the Serial Number will display the Service History List.
Selecting View Service History from the Serial Number will display the Service History List.
The Service History List is a list of all appointments that have had the Serial Number that you selected previously linked to them. To display the details of the appointment and view more information – tap on the Job Card / Service Desk in the list to open it.
Select back when done to return to the Service History List and back again to return to the selected Serial number screen.
Fault
Log Fault / Fault List Screen
Selecting the View Faults option from the Job Card displays a list of Faults that have been logged for the selected Job Card.
To select a Fault in order to view it or to upload or link pictures to it – tap on it in the list and the View Fault screen will be displayed.![]() To log a new fault select the Log a new Fault Icon and complete the details for the fault. Use the
To log a new fault select the Log a new Fault Icon and complete the details for the fault. Use the ![]() Search buttons to get your organisations Categories and priorities. If you are able to acquire a Purchase Order Number from your customer then enter it into the Purchase Order field.
Search buttons to get your organisations Categories and priorities. If you are able to acquire a Purchase Order Number from your customer then enter it into the Purchase Order field.![]() Select save. This will create the fault and return you to the fault list displaying the fault reference number that can be supplied to the client if needed.
Select save. This will create the fault and return you to the fault list displaying the fault reference number that can be supplied to the client if needed.
View / Edit Fault
Tapping the Fault displays the Logged Fault.![]() You can select the option to Attach Images or View Attached Images this will show a list of pictures (images) that have already been attached or linked to the selected fault.
You can select the option to Attach Images or View Attached Images this will show a list of pictures (images) that have already been attached or linked to the selected fault.
You can also select the option to upload and link pictures (images) to the selected fault.
Time, Travel and Expenses

Working With Time, Travel and Expenses
![]() From the Job Card selecting Time Travel and Expenses will open Time, Travel and expenses with a list of items you have already added.
From the Job Card selecting Time Travel and Expenses will open Time, Travel and expenses with a list of items you have already added.![]() Selecting Add Time, Travel And Expenses button will launch the Time Travel and Expense Entry Form.
Selecting Add Time, Travel And Expenses button will launch the Time Travel and Expense Entry Form.
If you selected an entry from the existing list you can edit that item as it will show you the selected item for editing. Selecting Save will write away your changes.
The list![]() icon will appear for labour, as well as length and time category and the details of work done.
icon will appear for labour, as well as length and time category and the details of work done.![]() icon will appear for travel, as well as the distance and details of travel.
icon will appear for travel, as well as the distance and details of travel.![]() icon will appear for expense, as well as the quantity and cost with the total and description of the expense.
icon will appear for expense, as well as the quantity and cost with the total and description of the expense.
Adding or Editing Expenses
When you enter the form it defaults to the first item in the list, you can click on the list it change it between Labour, Travel or Materials. This affects the layout of the form.
Labour:
Comes from timesheets and can be edited in timesheets
Travel:
Only accessible if the appointment is linked to a Job Card
Capture the details, date and the km’s traveled.
Materials:
Only accessible if the appointment is linked to a Job Card
Capture the details of items purchased. You can edit the Purchase Date and capture the quantity and cost. The system will calculate the total cost automatically.
Attach file
Attached Images Screen![]() From the Job Card View screen and the View Fault screen you can select the option to View Attached Images. This will allow you to view photos and images that have previously been uploaded to your organisation’s PFIM CMMS installation either by you or by other operators.
From the Job Card View screen and the View Fault screen you can select the option to View Attached Images. This will allow you to view photos and images that have previously been uploaded to your organisation’s PFIM CMMS installation either by you or by other operators.
The list of attached images is displayed.
To zoom or view a full screen version of the photo tap the image to view, pinch zoom allows you to zoom in and out of the image.![]() To add an attached image select the Add Image button.
To add an attached image select the Add Image button.
If access to storage has not been granted it will prompt now, if it has not been granted yet.
Select Images To Link Screen
After you select the option to Attach and Upload Images the Select Images To Link screen is displayed.
Please note that this allows you to select pictures from your Gallery this means that you must have already taken any photos that you want to upload or link to the fault.
When the image is loaded it is available to rotate till you are happy, then select Accept.
It will now return you to the Images to be linked screen.
![]() Selecting the No Entry will empty your list and remove all queued items.
Selecting the No Entry will empty your list and remove all queued items.![]() Selecting upload will push your images to the server and associate it with the job card.
Selecting upload will push your images to the server and associate it with the job card.![]() Pause indicates image is queued for upload. Images Selected To Be Linked
Pause indicates image is queued for upload. Images Selected To Be Linked![]() Tick indicates image has been uploaded and linked to job card
Tick indicates image has been uploaded and linked to job card
Job Card Signing
The Sign Button is hidden until all equipment linked to the job card has been serviced.
Tapping the Sign button on the bottom of the View screen will display the fields set in the hierarchy, this could include name of person signing off, signature, or customer feedback. Capture the details.![]() At this time you should select Appointment Complete on the bottom of the view screen then select back and choose yes to save.
At this time you should select Appointment Complete on the bottom of the view screen then select back and choose yes to save.
Coming Later
Scanning Barcodes
To launch the Barcode Scanner tap the ![]() button labelled Launch Barcode Scanner from the Job Card View screen under Barcode Scanning Options.
button labelled Launch Barcode Scanner from the Job Card View screen under Barcode Scanning Options.
As the barcode scanning application instructs (in text at the bottom of the screen) “Place the barcode to be scanned inside the viewfinder rectangle to scan it” place the Red Line over the barcode and ensure that the barcode fits between the ends of the red line. Move your device closer or further from the barcode to enable the scanner to focus on the barcode.
When the barcode has been successfully scanned the barcode will be displayed on the screen as in the image below.
To return to the PFIM Mobile Workforce Management Application click the Back button on your mobile device.
If you are unsuccessful in scanning the serial number you can return to PFIM and select Manually Enter Unit Serial Number and capture the Asset Tag or Serial Number.
After Scanning A Barcode
After you return to the PFIM Mobile Workforce Management Application you can tap the Verify Scanned Unit For Servicing button – this will advise you as to whether the barcode that was most recently scanned should be serviced or not or if it has already been scanned or serviced.
The first screen shows a successful confirmation – that you can proceed to service the unit if mark as service is enabled.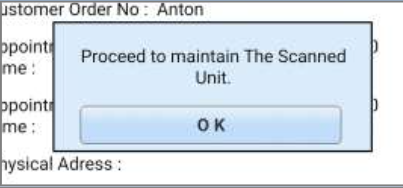
The second screen shows what is displayed when you have scanned a barcode that is NOT in the list of units to be serviced.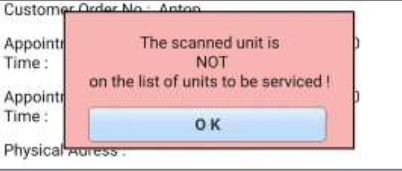
The third screen shows what is displayed when you have scanned a barcode that has already been marked as serviced.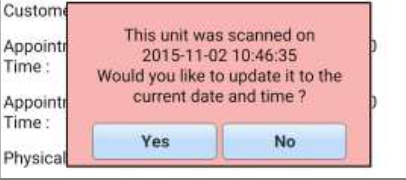
After all units have been scanned and serviced you can tap the Appointment Complete tick box. This will alert your admin department to the fact that you have completed the Job Card when you next Synchronise with your organisation’s PFIM CMMS installation.
Search Knowledgebase Screen![]() From the Job Card View screen you can search your organisation’s PFIM CMMS Knowledgebase. This can help with fault diagnosis.
From the Job Card View screen you can search your organisation’s PFIM CMMS Knowledgebase. This can help with fault diagnosis.![]() When first opening knowledge the refresh will connect to the server and update your local knowledge with the server copy.
When first opening knowledge the refresh will connect to the server and update your local knowledge with the server copy. Search for Category will provide a list of categories and enable you to only return results from a selected category. Type in the term or word to search for and tap the Search button. A list of possible matches is displayed. To view the solution if it does not fit in the list select it. You will be presented with the problem and solution screen for the selected item.