
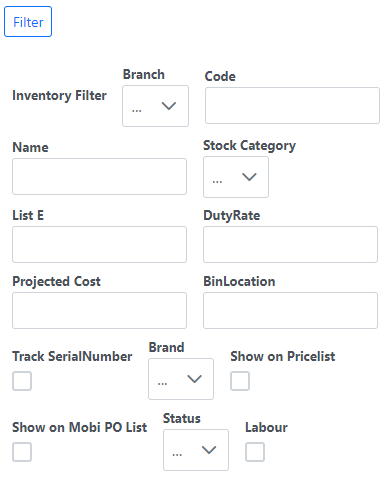
On selecting Inventory you will be able to filter stock.
List
Once you’ve filtered it will show a list of stock that fall under the filter requirements you’ve selected. You can edit the number of records per page, on Inventory the default is set to 10.
You can see the records you are viewing, for example, below is showing that I am on Page 2 with 10 results per page, showing results 11 to 20 of 22.

Detail
If you click on a stock product it will take you to the Detail tab. This is where you will be able to see and edit all the details of a specific stock item. Stock details include Branch, Code, Name, Weight, Size, Prices for different price lists, Currency, Vat, Status, Brand, etc.
In the Detail tab you will also find a couple check boxes:
Show on Pricelist check box, if this is checked on, the item will be shown on the Point-Of-Sale.
Track SerialNumber check box, when this is checked on, it enables that unit to be picked by technicians as an item that can have serial number.
Show on Mobi PO List check box, when this is checked on, it allows technicians to be able to request that product for a job.
Labour check box, if checked on, only users with access can view the costing of this product.
If any changes are made, the save button  in the bottom right corner becomes available.
At the very bottom of this tab you can also find a history of purchase and sales of the product within a selected time period.
New
To add a new inventory item, click on the New tab. You will need to fill in details of the new item including Branch, Code, Name, Weight, Size, Stock Category, Prices for different price lists, Currency, Vat, Status, Brand, etc.
In the New tab you will find the same check boxes as in the Detail tab:
Show on Pricelist check box, if this is checked on, the item will be shown on the Point-Of-Sale.
Track SerialNumber check box, when this is checked on, it enables that unit to be picked by technicians as an item that can have serial number.
Show on Mobi PO List check box, when this is checked on, it allows technicians to be able to request that product for a job.
Labour check box, if checked on, only users with access can view the costing of this product.
Once you are happy with all the details you have entered for a product, press Submit. You will be taken to the Detail tab and it will be showing you the details of the item you just added.
Transact
You can only Transact if you have user access Stock Issues in the Source Branch and Stock Receipts in the Destination Branch.
To move stock from one branch to another, click on the Transact tab. You will need to select the Source (branch the stock is coming from) and Destination (branch the stock is going to), choose the date for the transaction, and a reference (default is current date).
You can then add stock by searching for it in the stock search bar. The stock code needs to be a valid stock code at both branches for it to be transferred between branches. When you click on an item it will be added to the transaction list. You can then change the quantity of items being transferred. If you need to remove an item that has been added, set the quantity to 0 (zero). Unit Cost and Unit Sell are shown for each item. Unit Cost are automatically calculated based on previous transactions of the stock item. If no Unit Cost is displayed it can be manually edited. Unit Sell is automatically calculated as standard price. At the bottom of the list it shows Total Unit Cost, Total Unit Sell and Total Count.
Once you’re happy with your list and quantities you can click Submit. A confirmation tick with show in the top right corner and the Transact tab will be cleared.
Stock Take
For a detailed description on Stock Take please click here.