
The List tab gives you a list of all your General Ledger Accounts at all your branches.
Detail
If you click on an account in the List tab it will take you to the Detail tab. The Detail tab shows you all the details of a specific account. It also shows you the transaction history for that account.
New
The New tab allows you to create a new account.
Transact
Under the Transact tab you have four options: Receipt, Payment, Cashbook and Journal.
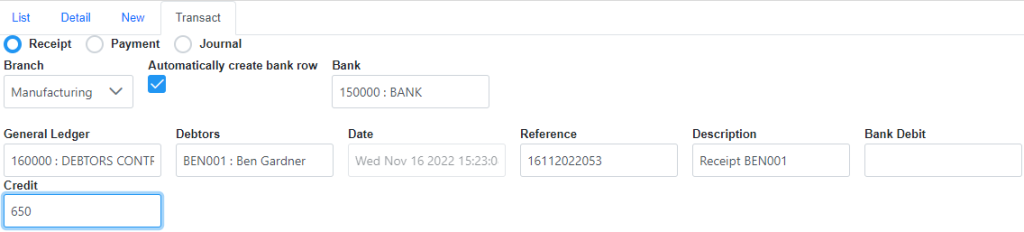
Receipt
First, select a branch. Then there is a check box “Automatically create bank row”, if you select this there will be two sides made in your general ledger. This makes it easier to keep the debit and credit amounts equal. Your default bank for the selected branch will automatically be selected for Bank, this can be easily changed. General Ledger will be automatically set to the selected branches default Debtors Control Account. You can choose a debtor, enter a reference and description. Enter a Credit amount and press Tab on your keyboard or click away and the details will make a new receipt.
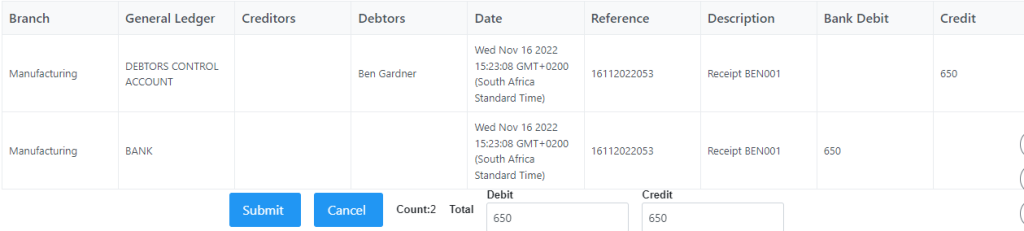
Once you’re happy with the entry and that the debit and credit amounts are equal you can press Submit. Alternatively, you can press Cancel if you don’t want to save the entry.
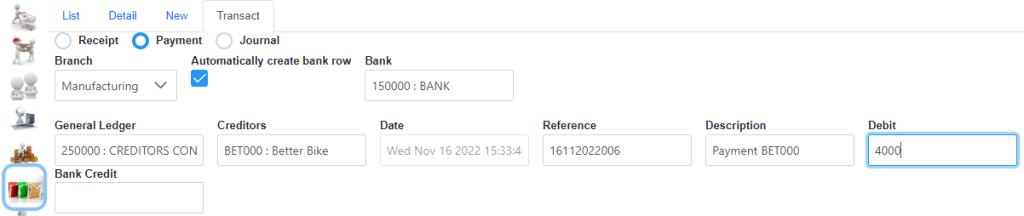
Payment
First, select a branch. Then there is a check box “Automatically create bank row”, if you select this there will be two sides made in your general ledger. This makes it easier to keep the debit and credit amounts equal. Your default bank for the selected branch will automatically be selected for Bank, this can be easily changed. General Ledger will be automatically set to the selected branches default Creditor Control Account. You can choose a creditor, enter a reference and description. Enter a Debit amount and press Tab on your keyboard or click away and the details will make a new payment.
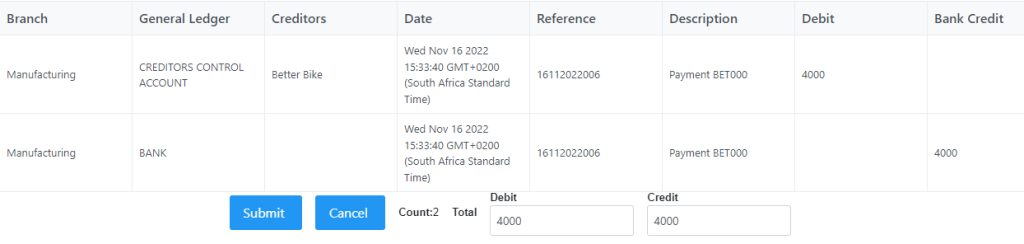
Once you’re happy with the entry and that the debit and credit amounts are equal you can press Submit. Alternatively, you can press Cancel if you don’t want to save the entry.
Cashbook
Cashbook is used when the transaction is needed to be presented as a payment or/and receipt but is more complicated than a standard Payment or Receipt.
Journal
Journal is used when the transaction is neither a payment nor a receipt. For example, salaries, petty cash, etc. To use the Journal you need to be familiar with Debit and Credit in double sided bookkeeping. Also note that Debit and Credit need to be in balance.
Upload
The Upload button allows the uploading of csv data for processing, at time of upload you need to set the branch the upload is for as well as give your upload a name, the name will default to the date-time of the upload if not set, the fields recommended in this file are:
 | General Ledger – This should be the Account Code at the Selected Branch SubAccount – When a Control account is selected as the General Ledger, like Creditors or Debtors you need to supply a Code for the Creditor or Debtor in the SubAccount field. Date – The date at which to process this transaction It will give an error if the Period is Blocked for processing in the Financial Calendar. Reference – The Referance for this item. Description – A description of the item being processed. Amount or Debit and Credit – If using the Amount option you need one column with credits being negative and debits being positive. If using Credit and Debit you will need two columns one for each. |
If these fields are not in the upload they will need to be set before you can process the transaction.
Retrieve

Retrieving an uploaded file will prompt you with all the named uploaded files in the system, you can filter by branch or a partial name.
After selection it will show in the grid at the top.
There is a dustbin icon on the right of each record to delete it if needed.
Processing Uploaded Transactions
By selecting a line at the top you push it down to the edit section if all data supplied matches it will be forced to the bottom grid, to edit once in the bottom select the record to return it to the editor.
Right clicking the grid will prompt to Delete or Transfer To Branch if you have multiple branches that you have access to.
Deleting a record like headings in the uploaded data the selected item will be removed.
Transfer to branch will transfer all items remaining in the top list to another branch of your choice.